
Installing an NVMe SSD heatsink incorrectly does more harm than running without one at all. A misaligned thermal pad can trap heat instead of transferring it, an overtightened screw can crack your M.2 drive or strip the motherboard standoff, and a loose heatsink can fall onto your graphics card or short against the case. Even leaving the plastic film on a thermal pad, which is surprisingly common, acts as an insulator and can push drive temperatures 20 to 30 degrees Celsius higher under load, leading to thermal throttling, slower file transfers, system stutters in games, and premature wear on the NAND flash.
Done correctly, a heatsink is a simple, effective upgrade that takes less than 15 minutes and requires no special skills. Most motherboards made in the last five years either include a built-in M.2 shield or have the mounting points ready for an aftermarket cooler. As of 2026, almost all mainstream NVMe drives in the 2280 form factor benefit from some form of cooling, especially PCIe 4.0 and PCIe 5.0 models that can draw 6 to 11 watts under sustained writes. This guide walks you through exactly what you need and how to install the cooler securely without damaging your motherboard or drive.
As an Amazon Associate we earn from qualifying purchases at no extra cost to you. Product prices and availability are accurate as of the date shown and are subject to change.

What You Need
| Item | Why You Need It | Optional? |
|---|---|---|
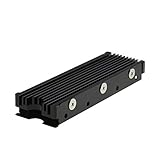
| M.2 2280 heatsink kit (heatsink + thermal pads + clips/screws) | Dissipates heat from the controller and NAND. A typical double-sided kit like the M.2 Heatsink Cooler 2280 SSD Double-Sided Heat Sink ($5.99) or the MHQJRH M.2 2280 SSD heatsink ($6.99) includes a 22 mm x 80 mm aluminum heatsink (weighs 30 to 45 grams, 8 to 12 mm tall) and 0.5 mm to 1.5 mm thermal pads. Aftermarket kits in this range usually cost $5 to $15. | No |
| Phillips #0 or #1 screwdriver | Removes the motherboard’s factory M.2 screw and secures the heatsink. Most M.2 screws are M2 x 3 mm. | No |
| Motherboard manual | Identifies which M.2 slot to use and whether it already has an integrated heatsink/shield you need to remove first. | No |
| Isopropyl alcohol (90%+) and lint-free cloth | Cleans old thermal pad residue from the drive or factory heatsink for better contact. | Yes, if reinstalling |
| Anti-static wrist strap or grounded metal surface | Prevents electrostatic discharge that can damage the SSD or motherboard. | Yes, highly recommended |
| Tweezers | Helps peel the clear film off thermal pads and position the M.2 screw without dropping it. | Yes |
| Flashlight or headlamp | M.2 standoffs and screws are small and often black on a black motherboard. | Yes |
Step-by-Step
Step 1: Prepare and Power Down – 2 minutes
Shut down your PC completely, flip the power switch on the power supply to Off (0), and unplug the power cable from the wall. Press and hold the PC’s power button for 5 seconds to discharge residual power. Move the case to a well-lit, flat surface and remove the side panel. Touch a bare metal part of the case chassis every few minutes to stay grounded, or put on an anti-static wrist strap clipped to the chassis. If your motherboard has RGB or standby LEDs that stay lit after shutdown, wait until they are fully off before touching anything.
Step 2: Locate the M.2 Slot and Remove Any Existing Cover – 2 minutes
Find your M.2 slots. They are usually located just below the CPU socket, between PCIe slots, or under a long metal shield labeled M.2 Shield, M.2 Armor, or Frozr. Consult your motherboard manual to confirm which slot supports PCIe 4.0 or 5.0 x4 for your drive, typically the top slot closest to the CPU offers the full bandwidth. If your motherboard already has a factory heatsink, remove the one or two Phillips screws holding it and lift it straight up. Set it aside. You will see a threaded standoff for a 2280 drive (80 mm long) and the M.2 connector at a 75-degree angle. If a drive is already installed, unscrew its single retaining screw at the far end and gently pull the drive out at a slight upward angle.
Step 3: Prep the SSD and Thermal Pads – 3 minutes
Unbox your heatsink kit on a clean surface. Most double-sided kits contain an aluminum top heatsink with fins, a flat metal base plate or second pad for the underside, two thermal pads, and either rubber retaining clips or screws with rings. Do not remove the protective film from the pads yet. First, lay the bare NVMe SSD on its back and check if it has a factory paper or foil label on top. Leave that label on unless the heatsink instructions tell you to remove it, most manufacturers design the label to be thermally conductive and removing it can void the warranty. If the drive is used, wipe the controller and NAND packages lightly with isopropyl alcohol and let it dry completely. Now peel the film off one side of the thicker thermal pad (usually 1.0 mm) and press it firmly onto the flat side of the heatsink that will contact the drive. Then peel the top film off that pad so the sticky, blue or gray silicone is exposed.
Step 4: Attach the Heatsink to the SSD – 2 minutes
Align the SSD over the heatsink so the gold connector pins overhang the heatsink edge and the semi-circular notch at the far end lines up. The drive itself measures 22 mm wide by 80 mm long, and the heatsink should cover the entire top surface from the connector to just before the mounting notch without overhanging the sides by more than 1 to 2 mm. Press the SSD down evenly onto the thermal pad with light pressure for 10 seconds. You want full contact over the controller chip (the larger square near the connector) and the NAND packages, with no air gaps. If your kit is double-sided and includes a bottom pad, apply the thinner 0.5 mm pad to the underside of the drive and clip on the bottom plate. For single-sided heatsinks, leave the bottom of the drive bare, it will face the motherboard. Secure side clips or rubber rings by stretching them into the grooves on the heatsink. The assembly should feel solid and not slide when you gently twist it.
Step 5: Install the Assembled Drive in the Motherboard – 2 minutes
Hold the SSD with heatsink attached at about a 20 to 30 degree angle and insert the gold connector straight into the M.2 slot until it seats fully. You should not see any gold pins once it is seated. While holding the connector end in place, press the opposite end (with the notch) down toward the brass standoff. The notch should center directly over the standoff hole. Insert the M.2 screw through the notch and tighten it with your Phillips screwdriver using fingertip pressure only. Stop as soon as you feel light resistance, typically a quarter-turn past contact. Do not overtighten. The screw only needs to prevent lift, the slot holds the drive horizontally. Aftermarket heatsinks that weigh 30 to 50 grams do not need extra force.
Step 6: Reassemble and Verify Temperatures – 3 minutes
Reinstall your graphics card or other components if you removed them for access. Replace the side panel, plug the power cable back in, flip the PSU switch to On (I), and boot into Windows or your operating system. To verify the installation, check the drive temperature. On Windows, open Task Manager, go to Performance and select your NVMe drive, or use your motherboard’s BIOS hardware monitor or a free utility like CrystalDiskInfo or HWInfo. At idle on a desktop with 22 to 24 degree ambient, a properly cooled NVMe drive should sit between 30 and 45 degrees Celsius. Copy a large 10 to 20 GB file or run a game load and watch the load temperature. With a good heatsink, most PCIe 4.0 drives will stay under 65 to 70 degrees under sustained load. If the idle temperature is above 55 degrees or spikes over 80 degrees immediately, power down and recheck the pad contact and film removal.
Mistakes to Avoid
The most common error is forgetting to peel both sides of the protective film from the thermal pads. The film is usually clear or light blue and can be hard to see. If left on, the pad cannot transfer heat. Always confirm you have sticky silicone touching both the heatsink and the drive.
Do not stack thermal pads to make up thickness unless the kit instructions specifically tell you to. Doubling a 1.0 mm pad to 2.0 mm creates an insulating layer and poor compression. Use the single pad thickness provided for your kit, typically 0.5 mm for the underside and 1.0 mm for the top.
Avoid using the wrong standoff position. Motherboards have multiple holes for 2230, 2242, 2260, and 2280 drives. If you screw into the 2260 position while using a 2280 drive, the drive will bend upward and lose contact with the heatsink, potentially cracking the PCB. The standoff for 2280 is the farthest from the connector, 80 mm away.
Never overtighten the M.2 screw. These screws strip easily and the standoff can break off the motherboard if forced. Tighten until snug and stop. If the heatsink includes its own long screw that replaces the motherboard screw, reuse the same standoff height, do not add extra spacers.
Do not install a thick aftermarket heatsink under a motherboard’s factory metal shield. The two will compete for space and create pressure on the drive. Choose one or the other. If your motherboard shield already has a pre-applied thermal pad, you do not need a separate aftermarket cooler, just use the factory shield with its pad after removing the film.
How Often
An NVMe heatsink itself does not need regular replacement. Once installed correctly, the aluminum fins and thermal pads will last the life of the drive, typically 5 to 7 years. Clean dust from the heatsink fins every 6 to 12 months when you clean the rest of your PC with compressed air, dust buildup in the fins can raise temperatures by 5 to 8 degrees over time. Hold fans still while blowing to prevent overspinning.
Replace the thermal pads only if you remove the heatsink to swap drives or move the SSD to a new motherboard. Thermal pads deform after compression and do not rebond well once peeled apart. New pads cost $6 to $10 for a multi-pack of 0.5 mm, 1.0 mm, and 1.5 mm sheets. If you notice idle temperatures creeping up by more than 10 degrees after a year with no change in ambient or workload, it is worth repasting or repadding the heatsink after cleaning.
When to Call a Pro or Replace
Call a professional or contact motherboard support if the M.2 standoff spins freely, is missing, or the screw is stripped and will not hold. Do not glue or tape the drive down. A repair shop can replace a press-fit standoff or retap the hole for $30 to $60 in labor, which is far cheaper than a new motherboard.
Replace the heatsink if it is bent, the fins are crushed, or it does not make flat contact across the drive even with a new pad. A warped heatsink, often from overtightening or a drop, will only cool the high spot and leave the controller exposed. New 2280 coolers are inexpensive, $5 to $15 for most air coolers, $20 to $35 for larger stacked-fin models with heat pipes for PCIe 5.0 drives.
Also consider replacing the drive itself if it continues to overheat above 80 to 85 degrees even with a correctly installed heatsink and good case airflow (at least two intake and one exhaust fan, each 120 mm or larger). Persistent overheating can indicate a failing controller or degraded thermal interface inside the drive package. Back up data immediately and check the drive’s health with SMART data. If the percentage used or media errors are high, replace the SSD before failure.
FAQ
Do I need a heatsink if my motherboard already has an M.2 shield?
No, you only need one. The metal shield included with most midrange and high-end motherboards is a heatsink. It usually has a thermal pad pre-applied underneath. Just remove the protective film from that pad and screw the shield back down over your bare drive. Adding a second aftermarket heatsink on top of the motherboard shield will not fit and can cause pressure damage. Use an aftermarket cooler only if your motherboard has no shield or you removed it.
Which side of the SSD does the heatsink go on?
The primary heatsink always goes on the top side, the side with the controller and NAND chips and the label. That is the hot side. Some double-sided kits also include a flat plate or second pad for the bottom side of the drive where there may be additional NAND. If your kit has two pads of different thickness, the thicker pad, usually 1.0 mm or 1.5 mm, goes on top between the chips and the finned heatsink, and the thinner 0.5 mm pad goes on the bottom if you use the base plate.
Can I reuse the thermal pad if I remove the heatsink?
It is not recommended. Once compressed, thermal pads take a set and tear easily when pulled apart, leaving gaps and air pockets on reinstallation. The thermal conductivity drops significantly. If you need to move or reposition the drive, clean off any residue with isopropyl alcohol and apply a fresh pad of the same thickness. Keep a spare sheet of 1.0 mm pad, they are inexpensive and widely available.
Will a heatsink make my NVMe SSD faster?
It will not increase the maximum advertised speed, but it prevents thermal throttling that makes the drive slower. Without adequate cooling, a PCIe 4.0 drive writing a large 50 to 100 GB file can heat from 45 degrees to over 75 degrees in 60 to 90 seconds and then throttle write speeds by 20 to 40 percent to cool down. A properly installed heatsink keeps the controller below the throttle point longer, so you maintain consistent peak speeds for sustained transfers and heavy gaming loads.
Related guides
- How Many Gigabytes Per Game on Portable Ssd? Size Guide With Measurements
- What Size External Hard Drive for Xbox Game Storage? Size Guide With Measurements
- How Much Backup Drive Space for 1tb Photo Archive? Size Guide With Measurements
- What Size Heatsink Fits Desktop Nvme Slot Clearance? Size Guide With Measurements
