
Installing a thermal pad on an NVMe heatsink is a small job, but the pad must make full, even contact between the SSD and the heatsink. If it is too thick, the heatsink may not clamp correctly or could press against the motherboard. If it is too thin, gaps can remain over the controller or NAND chips, reducing heat transfer. Leaving protective film in place, covering the wrong components, or installing the heatsink at an angle can also cause poor cooling, unstable performance, or physical damage.
The process usually takes 10 to 20 minutes. It applies to desktop M.2 2280 NVMe drives and many laptop-compatible heatsinks, although the computer’s manual should always take priority. Before buying a pad, check the drive’s length, the heatsink’s mounting method, and the required pad thickness.
As an Amazon Associate we earn from qualifying purchases at no extra cost to you.

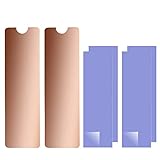
What You Need
| Item | Why | Optional? |
|---|---|---|
| NVMe heatsink | Moves heat away from the SSD and releases it into the surrounding air. | No |
| Thermal pad, usually 0.5mm to 1.5mm thick | Fills the microscopic gap between the SSD components and heatsink. | No |
| Small Phillips screwdriver | Removes the M.2 retaining screw and opens some heatsinks. | No for screw-mounted drives |
| ESD wrist strap or grounded metal surface | Reduces the risk of static-electricity damage. | Yes, but recommended |
| Isopropyl alcohol, 90% or higher, and lint-free cloth | Removes fingerprints, dust, and old thermal material. | Yes |
| Plastic tweezers or a clean plastic card | Helps lift liner films and position the pad without tearing it. | Yes |
| Replacement pad kit | A 70x20x1mm, 4-piece pack, such as the SGTKJSJS M.2 Thermal Pad, can be trimmed for M.2 2280 drives. Similar kits commonly cost about $5 to $10. | Yes if your heatsink includes a pad |
Some laptop heatsinks use copper plates and thin nano thermal pads. A two-piece Laptop NVMe M.2 Heatsink with Nano Thermal Pads for 2280 M2 SSD Laptop is an example of this style; comparable products often cost about $8 to $15. Confirm that the pad thickness and mounting clips match your laptop before installation.
Step-by-Step
1. Confirm compatibility and pad thickness (3 minutes)
Turn off the computer completely, unplug the power cable, and disconnect the laptop battery if the service manual allows it. Check that the SSD is an M.2 2280 drive, which measures approximately 22mm wide by 80mm long. Shorter 2230 or 2242 drives need a different heatsink or a pad cut to the correct footprint.
Read the heatsink instructions for its recommended thickness. A common starting point is a 1mm pad for a bare desktop NVMe drive, but this is not universal. Some laptop assemblies require a thinner 0.5mm pad, while a recessed heatsink may need 1.5mm. Do not select thickness based only on the drive’s label or the heatsink’s appearance.
2. Shut down and prepare the work area (2 minutes)
Work on a clean, dry, non-carpeted surface with good lighting. Touch a grounded metal part of the computer case before handling the SSD, or wear an ESD wrist strap. Hold the drive by its edges. Avoid touching the gold connector, memory chips, or the small controller chip.
If the SSD is already installed, remove the M.2 retaining screw and gently slide the drive out of its socket at a shallow angle. Never pull it straight upward while it is still engaged in the connector.
3. Inspect the SSD and heatsink (2 minutes)
Identify the components on the top side of the SSD. The main controller and NAND flash packages are typically the raised chips that need thermal contact. Do not place a pad over the gold edge connector, the mounting hole, or components that the manufacturer says must remain uncovered.
Inspect the heatsink for burrs, sharp edges, protective stickers, and old adhesive. A heatsink should sit flat without rocking. If it has a thermal pad already installed, determine whether it is intended to remain in place or be replaced. Do not stack a new pad on top of an old one unless the manufacturer specifically instructs you to do so.
4. Clean the contact surfaces (2 minutes)
Use a lint-free cloth lightly moistened with 90% or higher isopropyl alcohol to clean the top of the SSD chips and the flat underside of the heatsink. Remove dust and fingerprints, then allow both surfaces to dry fully. Do not pour alcohol directly onto the drive, and do not scrape the chips with a metal tool.
5. Measure and cut the thermal pad (2 minutes)
Measure the area that needs coverage and cut the pad slightly smaller than the heatsink’s contact surface. For a 22mm-wide M.2 2280 drive, a strip around 20mm wide is often appropriate, but follow the heatsink’s shape rather than covering the entire circuit board. A 70x20x1mm pad can usually be trimmed to length with clean scissors or a sharp hobby knife.
The pad should cover the raised chips evenly without extending into the connector or overhanging the edge enough to interfere with clips. Keep the cut straight. A torn or heavily compressed edge can make positioning more difficult.
6. Remove one protective film and position the pad (2 minutes)
Thermal pads normally have a clear or opaque liner on both sides. Remove only one liner first, exposing the tacky surface. Avoid touching that surface with your fingers.
Align the pad over the intended chip area, then lower it from one end to the other. Press lightly with a clean plastic card to remove obvious air pockets. Do not stretch the pad, fold it, or press hard enough to deform it. If the pad lands incorrectly, lift it carefully and reposition it rather than dragging it across the chips.
7. Remove the second film and attach the heatsink (3 minutes)
Peel away the remaining liner, checking that the pad stays in place. Hold the heatsink parallel to the SSD and lower it straight down. Do not slide it across the exposed pad.
Secure the heatsink using its supplied screws, clips, or elastic bands. Tighten screws gradually in an alternating pattern until they are snug. Do not force them; small M.2 heatsink screws can strip easily. The heatsink should make firm, even contact, but it should not bow the SSD or press the circuit board against the motherboard.
8. Reinstall and check clearance (3 minutes)
Insert the SSD into the M.2 socket at approximately a 20- to 30-degree angle, then lower it until the mounting hole lines up with the standoff. Replace the retaining screw. Check that the heatsink does not touch nearby memory slots, graphics cards, motherboard components, or the case panel.
For laptops, verify that the bottom cover closes without pressure. If the cover will not sit normally, stop and investigate; forcing it can damage the drive or motherboard.
9. Test the installation (5 minutes)
Start the computer and confirm that the NVMe drive appears in the operating system. Copy a large file or run your usual workload while watching the drive’s temperature with a trusted hardware-monitoring utility. Exact temperatures vary with the SSD, airflow, workload, and room temperature. Look for normal operation and the absence of sudden errors, disconnects, or unusual throttling.
Mistakes to Avoid
- Leaving one or both protective films on the pad. The liner blocks or greatly reduces thermal transfer.
- Using thermal paste instead of a thermal pad where the heatsink requires a controlled gap. Paste cannot provide the intended thickness or mechanical support.
- Choosing a pad that is too thick. Excess thickness can prevent proper seating or put pressure on the drive.
- Using a pad that is too thin. It may not touch the heatsink, leaving an air gap.
- Covering the M.2 connector, mounting hole, or unrelated motherboard components.
- Stacking multiple pads to compensate for an unknown thickness. Use the correct single pad whenever possible.
- Overtightening screws or bending the heatsink to force contact.
- Handling the SSD by its chips or connector instead of its edges.
- Ignoring airflow. A heatsink can absorb heat, but it still needs moving air to release it.
How Often
A properly installed thermal pad usually does not need routine replacement. Inspect it when you remove the heatsink, upgrade the SSD, clean a dusty system, or notice new temperature-related throttling. Desktop users may check the installation every two to three years; laptops can be inspected during scheduled internal cleaning or whenever the bottom cover is already removed.
Replace the pad if it is torn, permanently flattened, oily, contaminated with dust, or no longer covers the intended components. Use the same thickness unless the heatsink manufacturer specifies otherwise. In 2026, many replacement kits remain inexpensive, so replacing a damaged pad is generally preferable to trying to reuse it.
When to Call a Pro or Replace
Get professional help if the SSD is not detected after installation, the computer repeatedly crashes, the motherboard socket appears damaged, or the heatsink prevents the case or laptop cover from closing. Stop immediately if you smell burning, see discoloration, or find a cracked circuit board.
Consider replacing the heatsink or pad when there is no even contact, the mounting hardware is missing, or the correct thickness cannot be confirmed. Replace the SSD if it reports repeated read or write errors, disappears from the system, has visible damage, or continues to malfunction after the heatsink is removed and the original installation is restored. A heatsink cannot repair failing flash memory or a defective controller.
FAQ
Which side of the thermal pad goes on the NVMe SSD?
Most thermal pads are non-directional, so either side can contact the SSD. Remove the protective film from both sides before final assembly. If one side has adhesive or a printed marking, follow the product instructions and place the adhesive side as directed.
How thick should an NVMe thermal pad be?
Common thicknesses range from 0.5mm to 1.5mm. A 1mm pad is often used with desktop M.2 heatsinks, but the correct choice depends on the gap between the SSD chips and heatsink. The pad should compress slightly when secured without bending the drive.
Can I cut a thermal pad to fit?
Yes. Cut it with clean scissors or a sharp blade on a protected surface. Make the piece large enough to cover the required chips, but keep it away from the connector, mounting hole, and any area that could interfere with the heatsink hardware.
Should the thermal pad cover the entire SSD?
No. Cover the raised components that need heat transfer, typically the controller and NAND packages. Covering the whole circuit board can create clearance problems and does not improve cooling where there is no direct heatsink contact.


