
Top 3 picks at a glance
The Short Answer
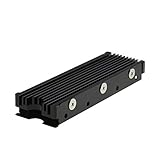
Most desktop motherboards have room for an M.2 heatsink up to 8–10mm thick without conflicting with the graphics card or neighboring components, and the standard SSD itself is 22mm wide by 80mm long (the “2280” form factor). In practice, that means a low-profile aluminum heatsink measuring roughly 22 x 70–80mm and 3–5mm thick will fit almost any desktop M.2 slot. If your slot sits directly under the primary PCIe x16 slot — common on many boards — keep total installed height (SSD plus heatsink) under about 8mm. Budget-friendly options like the GLOTRENDS 2-pack at $7.99 use 3mm-thick aluminum and fit virtually every desktop build, while taller solutions such as adapter-card heatsinks (around $16.95 for the Sabrent Gen5 model) require verifying 15mm or more of vertical clearance.
Standard Sizes
M.2 SSDs come in fixed lengths, and heatsinks are made to match. Here are the dimensions that matter, in both inches and centimeters:
As an Amazon Associate we earn from qualifying purchases at no extra cost to you. Product prices and availability are accurate as of the date shown and are subject to change.



| Item | Dimensions (inches) | Dimensions (cm) | Notes |
|---|---|---|---|
| M.2 2230 SSD | 0.87 x 1.18 in | 2.2 x 3.0 cm | Common in handhelds and some laptops; rare in desktops |
| M.2 2242 SSD | 0.87 x 1.66 in | 2.2 x 4.2 cm | Short desktop/laptop drives |
| M.2 2260 SSD | 0.87 x 2.36 in | 2.2 x 6.0 cm | Less common legacy length |
| M.2 2280 SSD | 0.87 x 3.15 in | 2.2 x 8.0 cm | The desktop standard; nearly all heatsinks target this size |
| M.2 22110 SSD | 0.87 x 4.33 in | 2.2 x 11.0 cm | Enterprise drives; check motherboard standoff support |
| Low-profile heatsink (e.g., GLOTRENDS style) | ~2.76 x 0.87 x 0.12 in | ~7.0 x 2.2 x 0.3 cm | Fits under GPU overhang in most cases |
| Mid-profile heatsink with pads | ~3.15 x 0.91 x 0.20–0.28 in | ~8.0 x 2.3 x 0.5–0.7 cm | Typical bundled motherboard heatsink thickness |
| PS5-specific heatsink | ~3.31 x 0.94 x 0.43 in | ~8.4 x 2.4 x 1.1 cm | Sized to Sony’s 110mm total length limit; e.g., Sabrent SB-PSHS at $13.99 |
| Adapter-card heatsink (PCIe x16) | ~4.7 x 2.7 x 0.6 in (card) | ~12.0 x 6.9 x 1.5 cm | Occupies a full expansion slot; needs ~15mm+ clearance |
All M.2 drives are 22mm (0.87 in) wide regardless of length, so width is almost never the problem — thickness and the slot’s physical position are.
How to Measure Your Space
- Locate the M.2 slot. Consult your motherboard manual or look for the small horizontal slot between the CPU socket and the PCIe x16 slot. Note whether it sits above, below, or directly beneath the graphics card.
- Measure vertical clearance. If a graphics card overhangs the slot, measure from the motherboard surface to the bottom edge of the GPU shroud. Most GPU backplates sit 8–15mm above the board. Your SSD plus heatsink must be thinner than this gap.
- Measure horizontal run. Confirm the distance from the M.2 slot’s standoff screw to the nearest obstruction (chipset heatsink, capacitor bank, or PCIe latch). You need at least 80mm (3.15 in) of clear run for a 2280 drive.
- Check the M.2 shield. Many modern boards include a factory heatsink or thermal armor plate. If yours has one, you generally don’t need an aftermarket heatsink at all — removing the shield to add one usually defeats its design.
- Account for the thermal pad. Pads add 0.5–1.5mm of thickness when compressed. Include this in your total stack height: pad (about 1mm) + SSD (about 2.3mm) + heatsink (3mm) ≈ 6.3mm total for a low-profile setup.
- Verify case clearance for adapter cards. If you’re using a PCIe x16 adapter like the Sabrent Gen5 card, confirm your case has an open x16 (or x4 electrically wired) slot and that the cooler height doesn’t clash with adjacent slots or cables.
By Room or Use Case
Compact Desktops and Small Form Factor Builds
In ITX and slim cases, airflow is limited and vertical space is precious. Stick to bare-bones aluminum sinks in the 22 x 70 x 3mm range — the GLOTRENDS 2-pack ($7.99) is typical. At roughly 5–10 grams each, they add negligible weight and fit under almost any GPU overhang. Passive aluminum is enough here because these cases usually place the M.2 slot in open airflow.
Full ATX Gaming Builds With a Large GPU
Modern triple-slot graphics cards frequently overhang the primary M.2 slot with only 5–10mm of gap. Measure before buying. If clearance is under 8mm, choose a 3mm flat heatsink or relocate your SSD to a secondary slot lower on the board. If clearance is 10mm or more, a 5–7mm finned heatsink improves heat spread for Gen4 drives that can pull 7–8 watts under sustained load.
PCIe 5.0 Workstations and High-End Builds
Gen5 SSDs can draw 10–12 watts and throttle quickly without substantial cooling. Motherboard-supplied armor with a built-in fan or thick finned stacks (10–15mm) are common. If your board lacks this, an adapter card with an integrated heatsink occupying a full x16 slot is the safer route — budget around $15–20 and confirm you have a spare slot with 15mm+ of surrounding clearance.
PlayStation 5 (Adjacent Use Case)
Sony requires the installed drive plus heatsink to stay under 110mm total length and 11.25mm total height (8mm width). Dedicated options like the Sabrent SB-PSHS ($13.99) or the MHQJRH unit ($6.99) are pre-sized to those limits, so you don’t need to measure — just confirm your SSD is a 2280 drive with the heatsink attached before sliding it into the PS5’s expansion bay.
Home Office and Media PCs
Prebuilt office towers and HTPCs rarely stress an NVMe drive hard enough to need more than a 3mm aluminum sink — or anything at all. If your drive never exceeds typical office workloads, the $7–8 two-pack option covers two machines with money left over. Prioritize fit and ease of install over thermal performance at this level.
Common Sizing Mistakes
- Buying for the wrong length. A heatsink sized for a 2242 drive leaves half a 2280 SSD’s controller uncovered. Always match the sink to the drive’s last two digits (80 for 80mm).
- Ignoring GPU overhang. The most common return reason is a heatsink that’s 2mm too tall for the gap under a graphics card. Measure the slot before ordering, not after.
- Forgetting the thermal pad thickness. A “3mm” heatsink is really closer to 5–6mm installed once the pad and SSD are stacked.
- Stacking heatsinks on motherboard armor. Adding an aftermarket sink on top of the factory shield traps heat rather than dissipating it. Use one or the other.
- Overbuying thickness. A 10mm tower-style sink does little extra for a Gen3 drive that tops out around 5 watts, and it may block the adjacent M.2 slot or SATA ports.
- Assuming all motherboards include mounting hardware. Some budget boards ship only one standoff. Verify you have the correct standoff position for a 2280 drive before removing the factory screw.
FAQ
Will a 3mm heatsink fit under my graphics card?
In the vast majority of desktop builds, yes. A 3mm aluminum sink over a 2280 SSD creates a total stack of roughly 5.5–6.5mm, which clears the 8–15mm gap found under most GPU backplates. If your card sits unusually low, measure the gap first.
Do I even need a heatsink for my NVMe SSD?
For Gen3 drives and light workloads, often not — the SSD’s own controller throttles safely before damage occurs. Gen4 drives benefit from at least a thin aluminum plate, and Gen5 drives realistically need substantial cooling. If your motherboard includes an M.2 shield, use it.
What’s the difference between desktop and PS5 heatsink sizes?
Desktop sinks optimize for low thickness under GPU overhang (typically 3–7mm tall). PS5 sinks like the Sabrent SB-PSHS or MHQJRH are built to Sony’s 11.25mm height ceiling and often include taller fins plus a backside pad. A PS5 sink will physically fit a desktop board, but a thin desktop sink may not cool adequately in a PS5.
Are cheap heatsink kits worth it in 2026?
For mainstream builds, absolutely. A $7–8 two-pack of 22 x 70 x 3mm aluminum sinks handles two Gen3 or Gen4 drives for less than the cost of a game, and aluminum at that thickness is sufficient for drives pulling under 8 watts. Spend more ($14–20) only for PS5-rated units, Gen5 drives, or adapter-card solutions with larger fin arrays.
